Thursday, September 30, 2010

Bread Pans

I bought these black bread pans off a R2 builder who sold allot of stuff, mostly AL items. Selling aluminum parts are like throwing chum in the water for sharks. Or tossing meat into a piranha tank. I had hoped for some other parts but they were sold, but was very happy to have him sell me these bread pans. I was thinking of making these myself from ordering online aluminum and bending it myself.

But I'm glad I didn't try to make them myself. Because I didn't know how a proper bread pan should be constructed. These I think are Comm8 James made install in his frame like Ferrari factory made. There are already holes taped in the frame and you install the bread pans in minutes.
I had to take out my Amp and mounting plate to fit this bread pan in.  I painted the mounting plate black to keep the black consistent and noticed it had started to rust after only 60 days?
My droid is now black from the front with the new add ons. I've come a long ways over the past few months of building.

The top Utility Arm is hanging too low. I don't know why or how to fix it yet. I will ask people smarter than myself how to resolve this problem.
All the doors are open, black bread boxes inside

As you can see the black bread pans fit together pretty tight. Real estate inside these droids is scarce when you get down to it. Every inch it eventually used for something. I had to take out my amp and rewire it to barely fit it back in.

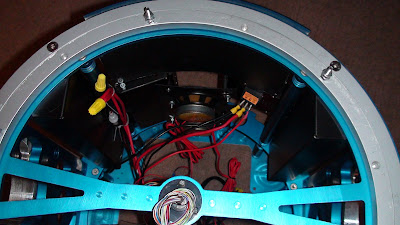
I had to redo the amp from this:
To this:
All those AMP and speaker wires I had looped and sticking out had to be redone and I expect to trim them again later and left some slack for when I do that. Notice the AMP is mounted to a steal plate thats screwed into the Comm8B frame. This touches the breadpan. I got lucky and mounted my amp to touch exactly where these breadpans do! But I wasn't lucky with the power wires, but now that's fixed.
 I've had these Utility Arms painted red and installed for a while but they are crooked and need sanding to clear the AL skins. So I said one day I'll get to getting around to making sure these open and close. So today was that day! I asked for some help on the Astromech BBS and did other droid work. Later I checked the board found some tips and acted upon them. Now my arms open and close.
Close but not perfect, the lower arm is tilted too high at the tip. My solution for that will be to drill into the tip of the arm, its resin. Then fill that full of lead to make it sink just alittle bit. Then sand and paint and these R5-D4 Utility Arms should be good to go.

Sunday, September 26, 2010

Paint Day

I woke up early today and intended to put in allot of hours into painting various parts. Paint and wait, sand and then reprimer or paint and so on...

What you see is four white half moon details, next to Krider Blue painted side vents, next to pocket vents, above is the center vents and to the right is 2 paints of white on the center ankle

Here is a AL Horseshoe hanging from a wire, blue taped, sanded and ready for primer.

I'm also putting filler on the skirt on the left, primered the two Horseshoes and put filler on both legs near the shoulder details.
Now I have a first coat of white on both Horseshoes. These will sit in the sun for a while and 24 hours later I'll inspect, maybe sand and put in filler if needed. If the part passes that I'll put one more final coat of white on them.

I'm happy with the results so far and this is just the first coat of white. I taped the inside of the buttons and details. I can later paint the inside button and shoulder details white if I want to change it up.
I pulled off the bottom ring of my Comm8A frame and I also pulled off the bottom door plate.  The white skirt connects to some of the this bottom and it needs to be painted white.
Now that beautiful blue is gone and here is the primer. The end justify the means in this case.
So there you have it. What was an awesome anodized blue bottom plate painted satin white and ready to cover the areas the JAG Skirt dont. Note all the tiny machine holes in this frame for possible add ons.
I have primed the JAG Skirt and then added some filler over the welded in bolts. After this drys I'll put some 120 grit sand paper on my cheap black N decker sander and have at it.
This is only the first coat of white on the skirt. I like to let this sit in the shade for 90 minutes and wait for the paint to set up. Then I put these parts in direct sun and Phoenix sun bakes the parts over a few days.  If you wait 3-4 days of your parts in the sun your finger prints won't be in your parts. The paint is cured and you don't have all those issues I read about with painting. 

I spray on a left to right pattern for coverage first. Then after this layer is painted on I do a up and down pattern. Then I paint a cross hatch pattern of up and down spray to cover all areas of the the part completely.
I had my wife tape up the power coupler and I'd paint it. She wanted to help build any part of this project so I said, hey tape up a PC.
Here is the Purple pass.
15 Minutes later I paint on the blue and leave the part to dry.


The upper right side is messed up. I'll have to fry this part in the sun for days. After 6 days curing outside in the AZ heat over 100 the silver paint still didn't completely dry as it looks above IMO. Its okay from 5 foot away or until I go imperial and paint this part black!

Three large AL parts with two coats of satin white paint on them sitting around the pool on the diving board curing in the sun. Ya, the pool needs more chlorine due to be dipping R2 parts in the pool and wet sanding them. 

As for the blue tape, I've learned my lesson and I'll remove the blue tape inside the horseshoes before the sun comes up. That blue tape will be hard to remove after a while in the Phoenix sun. Then I'll let the part bake tape free to continue to cure for a couple of days and assemble the droid this weekend. Most of it laying all over the backyard right now. I find as you build you often put your droid together as much as you can, then break him down and repeat the process until your 'done'. if that ever could be done droid building..
Now I just wait a few days and put these back together and rebuild the legs painted this time. Its dark so the white photographs a grey color but its as white as all the parts seen the droid so far.
I painted a first coat of white satin on the legs. If you have lots of cans of paint, you can can't paint a droid with one can of white paint. You're going to need six cans or more of white for an R2-D2 IMO. Use your fresh can of paint for the second coat or finish coat. Used cans of paint that kinda of sputter, have compression issues, seem like duds or have problems for your first coat When putting on a final coat use a fresh can of paint.
This is what I'm using for paint from Lowes. Rustoleum Satin White 15oz can. I also primerd the boosters covers.

Booster Covers painted in Krider Blue. This little piece of drywall has been painted several colors over the past couple of months. I think so far I've went through 3 cans of primer paint, and 3 15oz cans of Satin White. Keep in mind some cans will turn out duds. Spray out splatter or have lack of compression issues. You'll go through quite a few cans painting a droid and be confident to do it again and fix mistakes.

Thursday, September 23, 2010

Slip Rings

I ordered 50 of these for R2 builders and they arrived today!
I mounted the slip ring in. I also took out the bottom ring plate and ready to start allot of part painting of pieces I've collected. The reason you use a slip ring is you send up usually 12-24 volts up through the wires to the head for electricity. This allows the head to rotate forever without binding up the wires as they turn without worrying about them snapping.
 

Sunday, September 19, 2010

General Droid Update

I had my droid ripped apart and broken down into basic pieces while I'm constantly painting some piece outside.

Here is a dry run of the new JAG Skirt.

The latest 2010 JAG skirt.

Note:  The four bottom screws are built into the frame as small bolts. You don't have screw heads. Just putty over then sand primer and paint.
 Here is another photo to showcase how awesome JAG makes these parts. The bolts are nearly apart of the frame mounting system of the skirt.
Just mount your four skirt stumps on this and its ready for the frame mounting.
Stop the train! The skirt wont' mount to the Comm8 frame. The 4 stumps were about 1/2 inch too short! So to temp mount this I added 6 1/4 inch washers to each stump. Then took some 1/4 male thread stock and added around a 1/2 inch beyond what the Comm8 post stud was to mount. 

 
I did a temp mount of outer painted white skins with non painted inner LA skins. I have 5 hinges on the skins done.. I'm juggling so many projects at once now. Its time to stop and take a few photos and then get back to work. I'm not sure where to go next. I know I need to fix those 2nd layer painted panels for the hinged doors onto the skins but unsure exactly the best way to do that yet.
Now I have 5 front doors hinged. But how do I hook up servos?
This will be painted and researched next.

Wednesday, September 15, 2010

Making Your Own Coin Returns

There are three Coin Returns on a droid. The front one is alittle different in size then the rear two. If you have the 'John Sherrell Aluminum Skins' you can make Coin Returns out of guess what? The aluminum Coin Returns you snapped out of the laser cuts. Here is how that's done.

First download the official plans from the Yahoo group. Get to know your Coin Retuns which are front and which are back. Make it easy on yourself by labeling each and every part you snap out of your aluminum skins. Even for parts you might thing about throwing away. You can reuse allot of this.

The tools I'm using to do this post are. A band saw, dremel, disc sander, files, pencil, super glue, metal ruler and clamps.

First of all your Coin Return from the 'John Sherrell Skins needs about 1/8 of an inch shaved off the top and bottom. Use the official plans and a digital caliper to make them the correct size then proceed to the photo below.

I marked the plans and then then cut out the center with a dremel. Then I use a hacksaw blade in a tiny hand cutter to finish the rest. 
Here is an example of my 4th attempt. Nearly perfect dremel cuts. Keep in mind to make the perfect Coin Return we work on the opposite site of the metal. In other wards were on the back side that we'll reverse later so any slip ups of the dremel on the skin won't be seen. Nor pencil marks and such.

After you do a rough hand cut out the inner piece. Place the Coin Return into a clamp and tighten it. Using a file you can now safely grind the aluminum down to your drawn out lines. Rotate the piece and file away until you're finish. This won't take long the metal is very thin.


After filing your Coin Return it should look like this.


Pictures above is the front Coin Return.  I super glued the bend back piece to see how it fits.

Here is the backside. Note the white bend part I super glued on the back is made from the left over AL that you have behind the center vents. The two side peaces can be made from the utility arm scrap. 

Now super glue and clamp the sides on for a 1/2 and hour and get the JB Weld ready. Or GOOP or whatever you fancy for gluing this stuff together.
Now JB Weld it, that's what I've found so far to work like liquid steel. This stuff very hard to cut with exacto knifes and seems like you could tap into it. I might try that but anyway this is the next step to assembly of the part.
 Here is a shot of the front. Not too bad.  It needs sanding or filing of the bottom and top. You could call it quits and here. Or you could add some filler and make the part pass HD quality inspection. Which I'm gonna do. So let's push it farther to movie quality or machined part run. Keep in mind you save about $100 while making these parts yourself instead of waiting on an AL run. Plus it ups your confidence level to build more complex parts and see what the styrene builders go thru.

The flip the skin skin is on the right with the pencil marks, bad cuts on the left.

Here is a rear coin return the version on the right is my best so far after doing this about four times now. I kinda of learned the ins and outs after a few of them. I don't like my painted versions I've done previously. You touch those versions and you blemish the paint. That's not good enough a solution for a droid. But the basics don't change from above. Keep making one at a time and each time you'll make a more accurate one each time.