Wednesday, March 16, 2011

Foot Shells and bars

Today I worked on screwing together my foot shells. They're made out of aluminum and quite light weight. I had to make all my own holes. I could of done this a while ago but I wanted to wait until I had some ankles to test it out. One ankle didn't fit so I pulled the U channel a bit wider. All the sudden it nearly split in 2 pieces and definately weakened the weld nearly tearing it apart. I nearly had a heart attack as that would nearly stop my droid from driving for another 8 months.

 Next up I need to either mount the JAG foot drives to the U channel or cut out where the NP motors go.
I also received some new parts to replace the broken Don Jar parts. The bars are 1 piece of solid aluminum. I'll mask tape it and prime it, then paint it black and then copper. The copper paints in only 2 coats if you first lay down a black layer. Otherwise it takes 4 coats of paint and forever to dry.
MAGNET FAIL!

My new 1.5 inch rare Earth magnets arrived! I certainly miscalculated here. These are way, way to strong and over kill in power. I had no idea they'd be this thick and strong. They are so strong I have yet to pull them apart. No way this will work on my droid. It would rip the power coupler right off since its only JB welded on. They'd probably rip a David Shaw screwed in power coupler right through the skin. That would be a sight to see.

So instead of waste $23 on these magnets. I'll use only 1 of them and use a less powerful smaller magnet on the other end. That's when I figure out how to separate both of them.

Magnets this powerful are good for making your own Ninja gloves, knee pads and feet so you can walk up a steel building. 

Tuesday, March 15, 2011

Jag Ankles Arrive

I've been waiting a while for the last and run of ankles to finish up. They are well worth the wait. Here's a test fit.
My legs are almost complete. Now with this final piece of the puzzle I can get both droids up on there drive trains soon. That will be my primary focus until that project is done.
Aluminum heaven! Its just like Christmas month after month.
I think I have this correct. The spacer plate goes over the outside and then the outer ankle goes over that. Then the screws tighten it down. My main question those is on the hardware used to fasten this together. More on that in a minute.
Here is a look inside the leg. These were made by Ryan in his leg run last summer. I think the threaded inserts are steel because of the rust. But whats holding them on? All of the weight of this heavy droid depends on 4 of them per leg not to fail. Its not welded but whats holding it?
Here is a look inside my other legs which are on R2-Q5. These legs have inserts on both sides of the leg.
Ryan's leg has holes that line up with the JAG ankle. However these legs don't line up with the holes. So I either gotta make new holes in the ankle to line up with the inserts or make the inserts line up with the holes or move them elsewhere.
These bolts came with the leg. They're not long enuff to fasten using the spacer plate. Are these really long enough to hold a 200 pound droid together? If those spacers fail my droid will face plant.
Here' is a pic from Paul's blog where the insert has broken off.
He used longer bolts to go through both sides of the leg.
I'm tempted to also go this route, but wonder what other builders have done to secure the ankles on the best they can.


Sunday, March 13, 2011

Octoports and more

I had a busy weekend and didn't have much time for the droids. I finally finished painting 1 of the octoports after several tries to get them right.
I'm really, really, really, really reluctant to even attempt to install these on my droids skins. Just look at the octoport on the left its already cracked and ready to shatter. Now way to even figure out how I'll JB weld these without them shattering. I'll have to take my skins on and off several times to get them perfect. I should just try to get resin replacements and plan on not using these.
Next I cut this U channel I got from Droidwelder and mounted them to a set of JAG drives. It will be quite a while another I can find some feet. So until then this will have to do for R2-Q5. Next week will be quite busy. 4 JAG ankles for both droids should be arriving. Then I can start to work on figuring out how to mount them to the leg and then getting both droids ready to be mobile.
No update would be complete without something on the never ending rear skin/back door project. This time I made 4.5 inch long by .750 strips from steel and screwed them to the lower part of the skins to help re-enforce the magnet section. Now I have something sturdy to grab when I want to pull off the skins. I don't have to worry about this layered area bending. Nor do I have to worry about the magnets sucking in the skins to far with the steel on it. I was kinda of bummed over the months this project was taking forever and not working. 

Now I"m quite happy with how everything has turned out. If anybody else has a Comm8A frame and full back door this is the way to go IMO. I also ordered 1.5 inch rare earth magnets that should arrive next week so I can upgrade the ones on the back door for more magnet power.

At this point I could probably reattach the outer rear skin. I think I'll hold off, order more VHB or whatever its called tape and wait for the 2 Xlarge hinges to arrive for the full doors. Then maybe just maybe in 5 weeks this part of the droid is 'done' for a while.

Thursday, March 10, 2011

More Rear Door work with magnets

Moving forward on R5. I took most of him apart today to get some work done. Batteries out and skirt off so I can replace the lower support rods that attach the skirt.
I was using the rod on the top with a bunch of washers. I just replaced them with the longer version that works with the JAG skirt better. Not like anyone will see this, but not it don't seem like its mish mashed together down there in my head. 

Now back to your regular programming of the never ending back door project!
Here is what I'm doing on my rear inner skins. Please think it threw before you attempt a full rear door, or alteast read what don't work. Anyway, I have screwed on 1 rare Earth magnet to the lower part of both skins and then mounted 3 4-40 screws with nylon nuts to fasten the bottom on. The strip above got 2 rounds of Gorilla Super glue. I think it didn't hold well last time because I painted the strip and then glued it on. Basically gluing the paint on  was wrong. Now I'm just gluing metal to metal.
Here is the other side. This creates a lip for the back door to rest on, other wise it falls through the skins. I made it a little bit too big so I can file it down to a perfect fit later (never ends). All the screws are counter sunk so the outer skin will hide them.
Its kind of hard to see. What I did here is drill and tap a 8/32 hole just over an inch above both lower support rods. Then mounted rare Earth magnets, and over that I glued on a plastic ring that came with the magnets. The idea is not to let both magnets touch. It takes too much forces to separate them and the skin is quite thin and it won't take too much to start bending it. I can adjust how far or close the magnets are by screwing this into or out of the frame support rod.
Another photo prior to gluing on the plastic spacer ring. The reason for this is to suck the lower skin as tightly to the frame as possible.
Here is one of many test fits. These magnets are quite strong and will bend your skin if you make too big of a gap.
This is working much better than when I tried to do this with velcro.
Now I made a prototype to hold on my rear door with a magnet and this piece of L bracket. The L bracket is a little to short but works. Since I put a magnet on my rear power coupler last week this should just kind of snap into place.
This holds the back door on so far but it don't take too much force to remove it. A bump in a sidewalk might drop the door. These rare Earth magnets are the best but under powered in this situation. I could add a few more magnets to make it stronger. I'm using I think 7/8 of an inch magnets. I should just order some 1.5 inch magnets for added power.

This never ending project now has a light at the end of the tunnel. I have pretty much accomplished the goals I set for myself to some degree. One thing I'll remember about this droid I won't forget is how much I wasn't looking forward do the back door from first cutting it out to its final magnet.

Wednesday, March 9, 2011

Debuilding day :(

We can't all be winning like Charlie Sheen for every winner there has to be a loser. Today I went backwards in my build. Meaning some of the past build days were for nothing.

 First off the good.
I took my other Rockler ring apart and replaced it with Lithium grease. That didn't help the rotation very much. So I polished it with Mothers. The end result is now it gets 2 full rotations per turn. Maybe more but it goes so fast I can only estimate around 2 rotation.
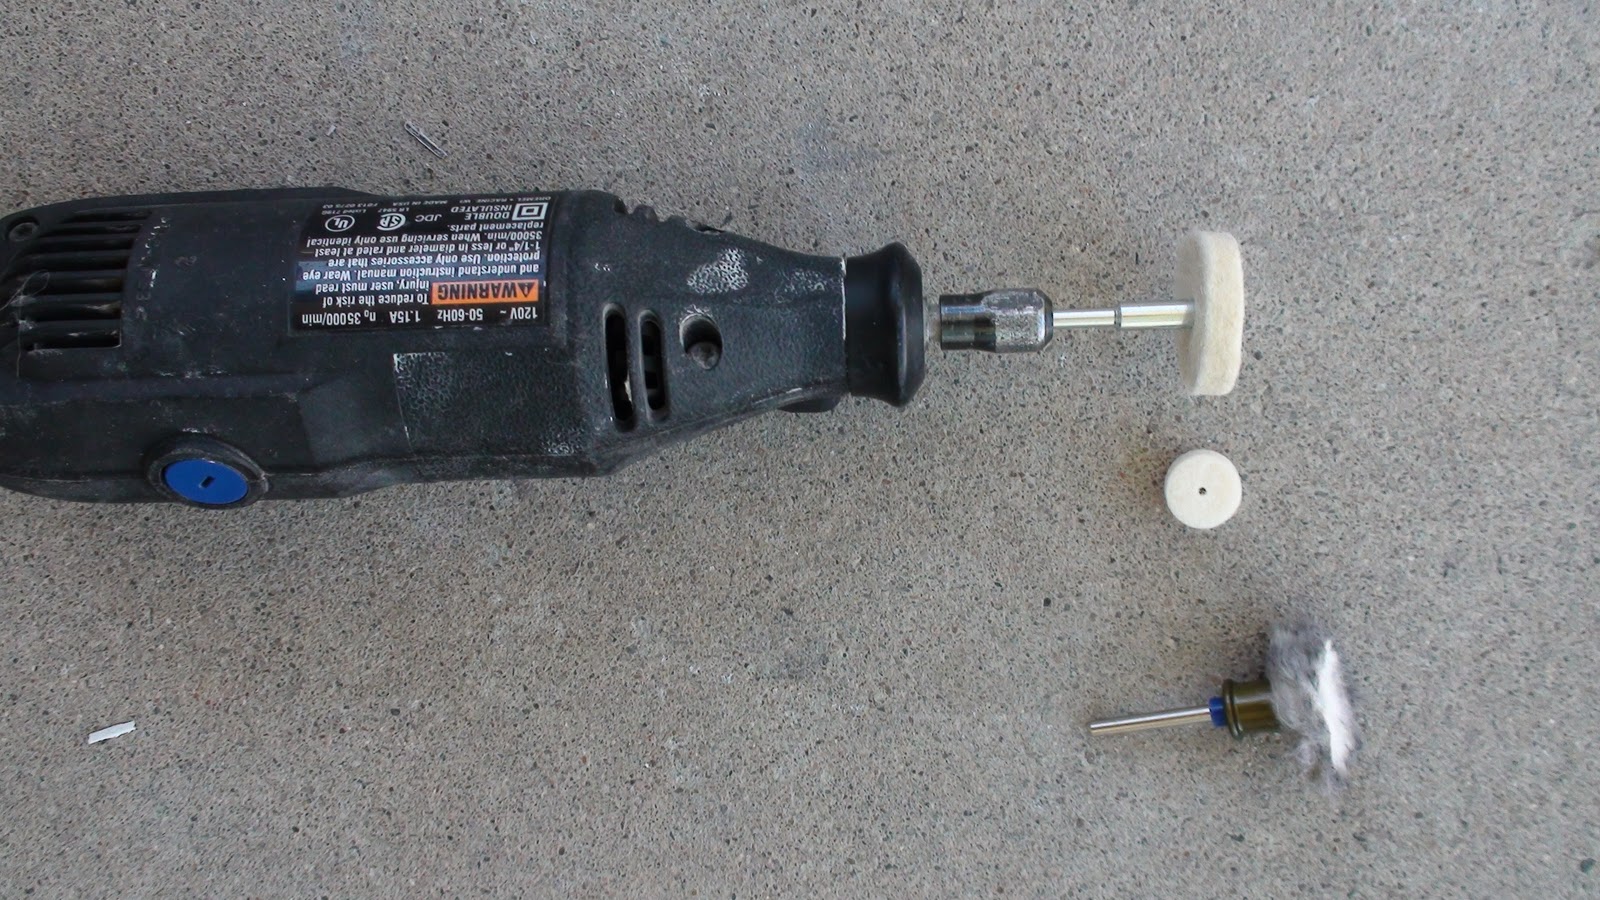
I'm polishing using the disc that's attached to the Dremel. Don't bother using the 2 pictured below it. They're expensive and will be chewed up at a higher rate. You'll get more mileage out of the one I'm using. You'll probably need 4-6 of them per Rockler depending on your experience doing this. Also don't do this all in one shot. Let your Dremel cool down. I'd suggest polishing 1/4 of the ring and let the Dremel cool down.

Now the Fail.
That new adhesive I bought didn't work. I didn't even have to install it and try, just touching it was clear that wasn't going to hold. So I ripped off the strips and started to think. I noticed my rear doors had the JB weld cracking. Too much wear and tear on them. I have purchased 2 Xlarge hinges so I figured what the heck. I'm going to have to take this JB weld off to hinge them.

WARNING: The following images might hurt a fellow droid builders eyes. This is your last chance to close down the blog.


This is something I never thought I'd be doing or taking pictures of. Stabbing my skins with butter knifes. Oh my what have I stooped down to now?

Sometimes I think that his blog is not some instruction manual on how to build droids. Its an instruction manual on what not to do. But seriously I have been thinking about doing this for around a month or more. However I thought I could get away with just using some adhesive for those strips. I decided to take all the rear skins apart and add somethings I didn't know that I'd need to have. More on that in the next couple of blogs.

But it gets worse. Just before this prior to this photo, this happened.
I was using a sanding wheel on the end of this Dremel to eat away the JB weld. The wheel slipped off the skins at one point and hit the shirt under the skins. In microseconds the shirt binded up the Dremel stopping it cold in its tracks. Then what seemed like 'bullet time' kicked in. I knew that if I didn't unplug the power to this Dremel fast 'magic smoke' would come out of it, and/or burn down the house next. First I reached for the Dremels off switch and for some reason  I fat fingered it and failed. Then I just grabbed the power cord and yanked it out of the wall to kill the power.

Too late, smoke was coming out of the Dremels vents. I thought there went 60 bucks, then put it aside and went back to polishing with my other Dremel. The Dremel took maybe a 2 second hit of motor being seized. Then like an idiot, 10 minutes later I said 'That cooled down, I'll use this Dremel to remove the rest of the JB Weld'. Then powered it up for 5 minutes and removed the rest of the JB weld. After I turned it off I noticed a nasty smell I couldn't tell if that was the smell of burnt JB weld or burnt up Dremel. Either way more 'magic smoke' was coming out of the Dremel. I'm going to put it away for a while so it can 'heal'. Maybe it nearly shot, or maybe I can buy some new bushings and repair it.
Now the rear skins are apart and I'm back to where I was a few months ago. However now I know what works and more importantly what don't work. Four months ago I wasn't aware of unknown unknowns that I now know what some of those unknowns are now known now but unknown back then. Now I'll attach the 2 magnets directly onto the inner skin. I'll also mount that strip with screws so it won't come off. The never ending rear door never ends.

So I might of wiped out one of my beloved Dremels but atleast I didn't bleed as much blood as yesterday.

If you have to take your skins apart don't bother sanding the tape or adhesive you used. You can but it won't do that much. I sprayed 2 layers of Goofoff and then use a razor blade and it peeled off like butter. Then I washed it with soap and water and its ready for me to do crazy things to on Thursday and crazy things will be done.
Dans power distribution board version 2.1. I have two of these in R5-D4 and this one will go in R2-Q5 to feed him power. Photo for reference. 12 volt comes in on the left of the board. Then next to it is 5 v, 9v, 9v, 12v, 12v, 12v.
Here is the back side of it. Not too many points to solder. I think I could put these together in around 30 minutes or so.  The 3 open slots you see I believe are on default 12 volt. If you add I think a resistor you can step it down to lower voltage.

Tuesday, March 8, 2011

Foot Drives

A brand new JAG foot drive system arrives! Now I have one of these for each droid. I just have to figure out how to hook them up. I need to save up for a set of NP motors to power this system.

I didn't work too much on the droids today. I put the rockler ring back together and used white lithium grease. I'd say it spins with 2 -3 times better and faster than it did before. When I do my other ring I just replace the grease without polishing to check the difference.
I've added a magnet on the rear skin next to the octoport. Now I'm testing out Loctite Power Grab all purpose construction adhesive to bond the AL to AL. This strip of AL that has magnets has to be attached to the skin with adhesive more powerful than rare earth magnets. I tried this before with superglue and the superglue failed.
On the other side of the skins I'm gluing this painted AL strip with a magnet on it. Tried super glue but it wasn't strong enuff. Now I'm testing a new adhesive that I mentioned above.
Here is how I have this rare Earth magnet attached to the lower rear skin using a 8/32 standoff. The other side of it is held on by a counter sunk bolt.
Here is the other side of it. This thin strip of AL makes a lip for the back door to rest again.This strip is great if it works, it must with stand the force of magnets pulling on it, 3M dual lock tape, plus the force of the back door pushing it in. I wish I had foresight to make this and just have the inner skin screwed to this in some places. Other wise it falls through. I've been messing with this back door forever now.
The magnets in the leg and shoulder hub are now done and installed and this system works. I going to do the same thing in my other droid. Even if your shoulder hub fits tight this is insurance it won't fall out over some bumps.

Monday, March 7, 2011

Magnets again

The JBweld is now dry on the back of my shoulder hubs. Next I attached rare Earth magnets which are seen here as black.
Then you drop your shoulder hub into the leg where you want it to attach.
On the other side of the leg let 2 magnets jump into position and hold the power coupler on.
Then tape them in place so they won't go anywhere.
Now take off those magnets from the back of your shoulder hub and let them position themself over your taped magnets in the back. I then super glued them into place and then JB welded them in. 24 hours later I can remove the tape in the back and insert my shoulder hubs.
On my rear full door I screwed and then taped a hole. I then attached this powerful rare Earth Magnet. I'll work on the other side that this attaches too later this week. 
In this photo if you look below the hole I counter sunk. You can see I just barely hit into the ring. That bumps out the aluminum which clearly will slow down your ring. I noticed of have 2 of these spots I'll need to file down before I polish this.
The other project today was taking apart my rockler and polishing the inside. This is supposed to make them spin better. I'm going to find out.  You untighten the retaining screw and the steel balls will fall out of the hole. Then I washed all the grease off the balls and the ring and bought some lithium grease. I got about 3/4 of the rings polished. I started to run out of polishing disc and called it a day after 5 hours of working on the droids today. I'll finish this project tomorrow. 

I also worked on my rear door skin with some magnets but screwed 1 side up. That will set me back 2 days as I have to cut and paint some parts to replace the ones I wrecked.